User Guide
In this section, you will learn how to operate AutoEpiCollect and access the outputted files to view your final epitope results.
Pre-Installed Files with AutoEpiCollect
The table below details the files that come with AutoEpiCollect's installation process. Users should not delete or tamper with any of these files as they are needed for AutoEpiCollect to run smoothly.
| File | Description |
|---|---|
| docs | A folder with the documentation you are reading right now. |
| immunogenicity | A folder with IEDB's MHC Class I immunogenicity tool. |
| population_coverage | A folder with IEDB's Population Coverage Analysis tool. |
| .readthedocs.yaml | A file specifying the build for the documentation page using readthedocs. |
| AutoEpiCollectGUI.py | The main GUI program used for AutoEpiCollect's epitope selection method. This should be the only pre-installed file that you will open and interact with. |
| PopCoverageOptimization.java | This is PCOptim, the program used for optimizing MHC Class I epitope/HLA pairs before population coverage analysis. |
| CD4PopCoverageOptimization.java | This is PCOptim-CD, the program used for optimizing MHC Class II epitope/HLA pairs before population coverage analysis. |
| MHCI_HLA_input.txt | The 27-allele HLA Class I reference set. |
| MHCII_HLA_input.txt | The 27-allele HLA Class II reference set. |
| environment.yml | The .yml file specifying the dependencies used to create the conda virtual environment for AutoEpiCollect. |
| mkdocs.yml | Another file specifying the build for the documentation page. |
| refactored_trainingset_cd4.csv | The training data used for the MHC Class II scoring function. |
| refactored_trainingset_cd8.csv | The training data used for the MHC Class I scoring function. |
Opening AutoEpiCollectGUI
First, navigate to the AutoEpiCollect directory using these command::
Windows:
cd %HOMEPATH%
cd AutoEpiCollect
Mac and Linux:
cd ~
cd AutoEpiCollect
To open the GUI program, enter the following commands into your Terminal or Anaconda Prompt::
conda activate aec_venv
python AutoEpiCollectGUI.py
Please be prepared to wait up to 2 minutes for the GUI to open on its first run. You should see a screen
similar to this one pop up.
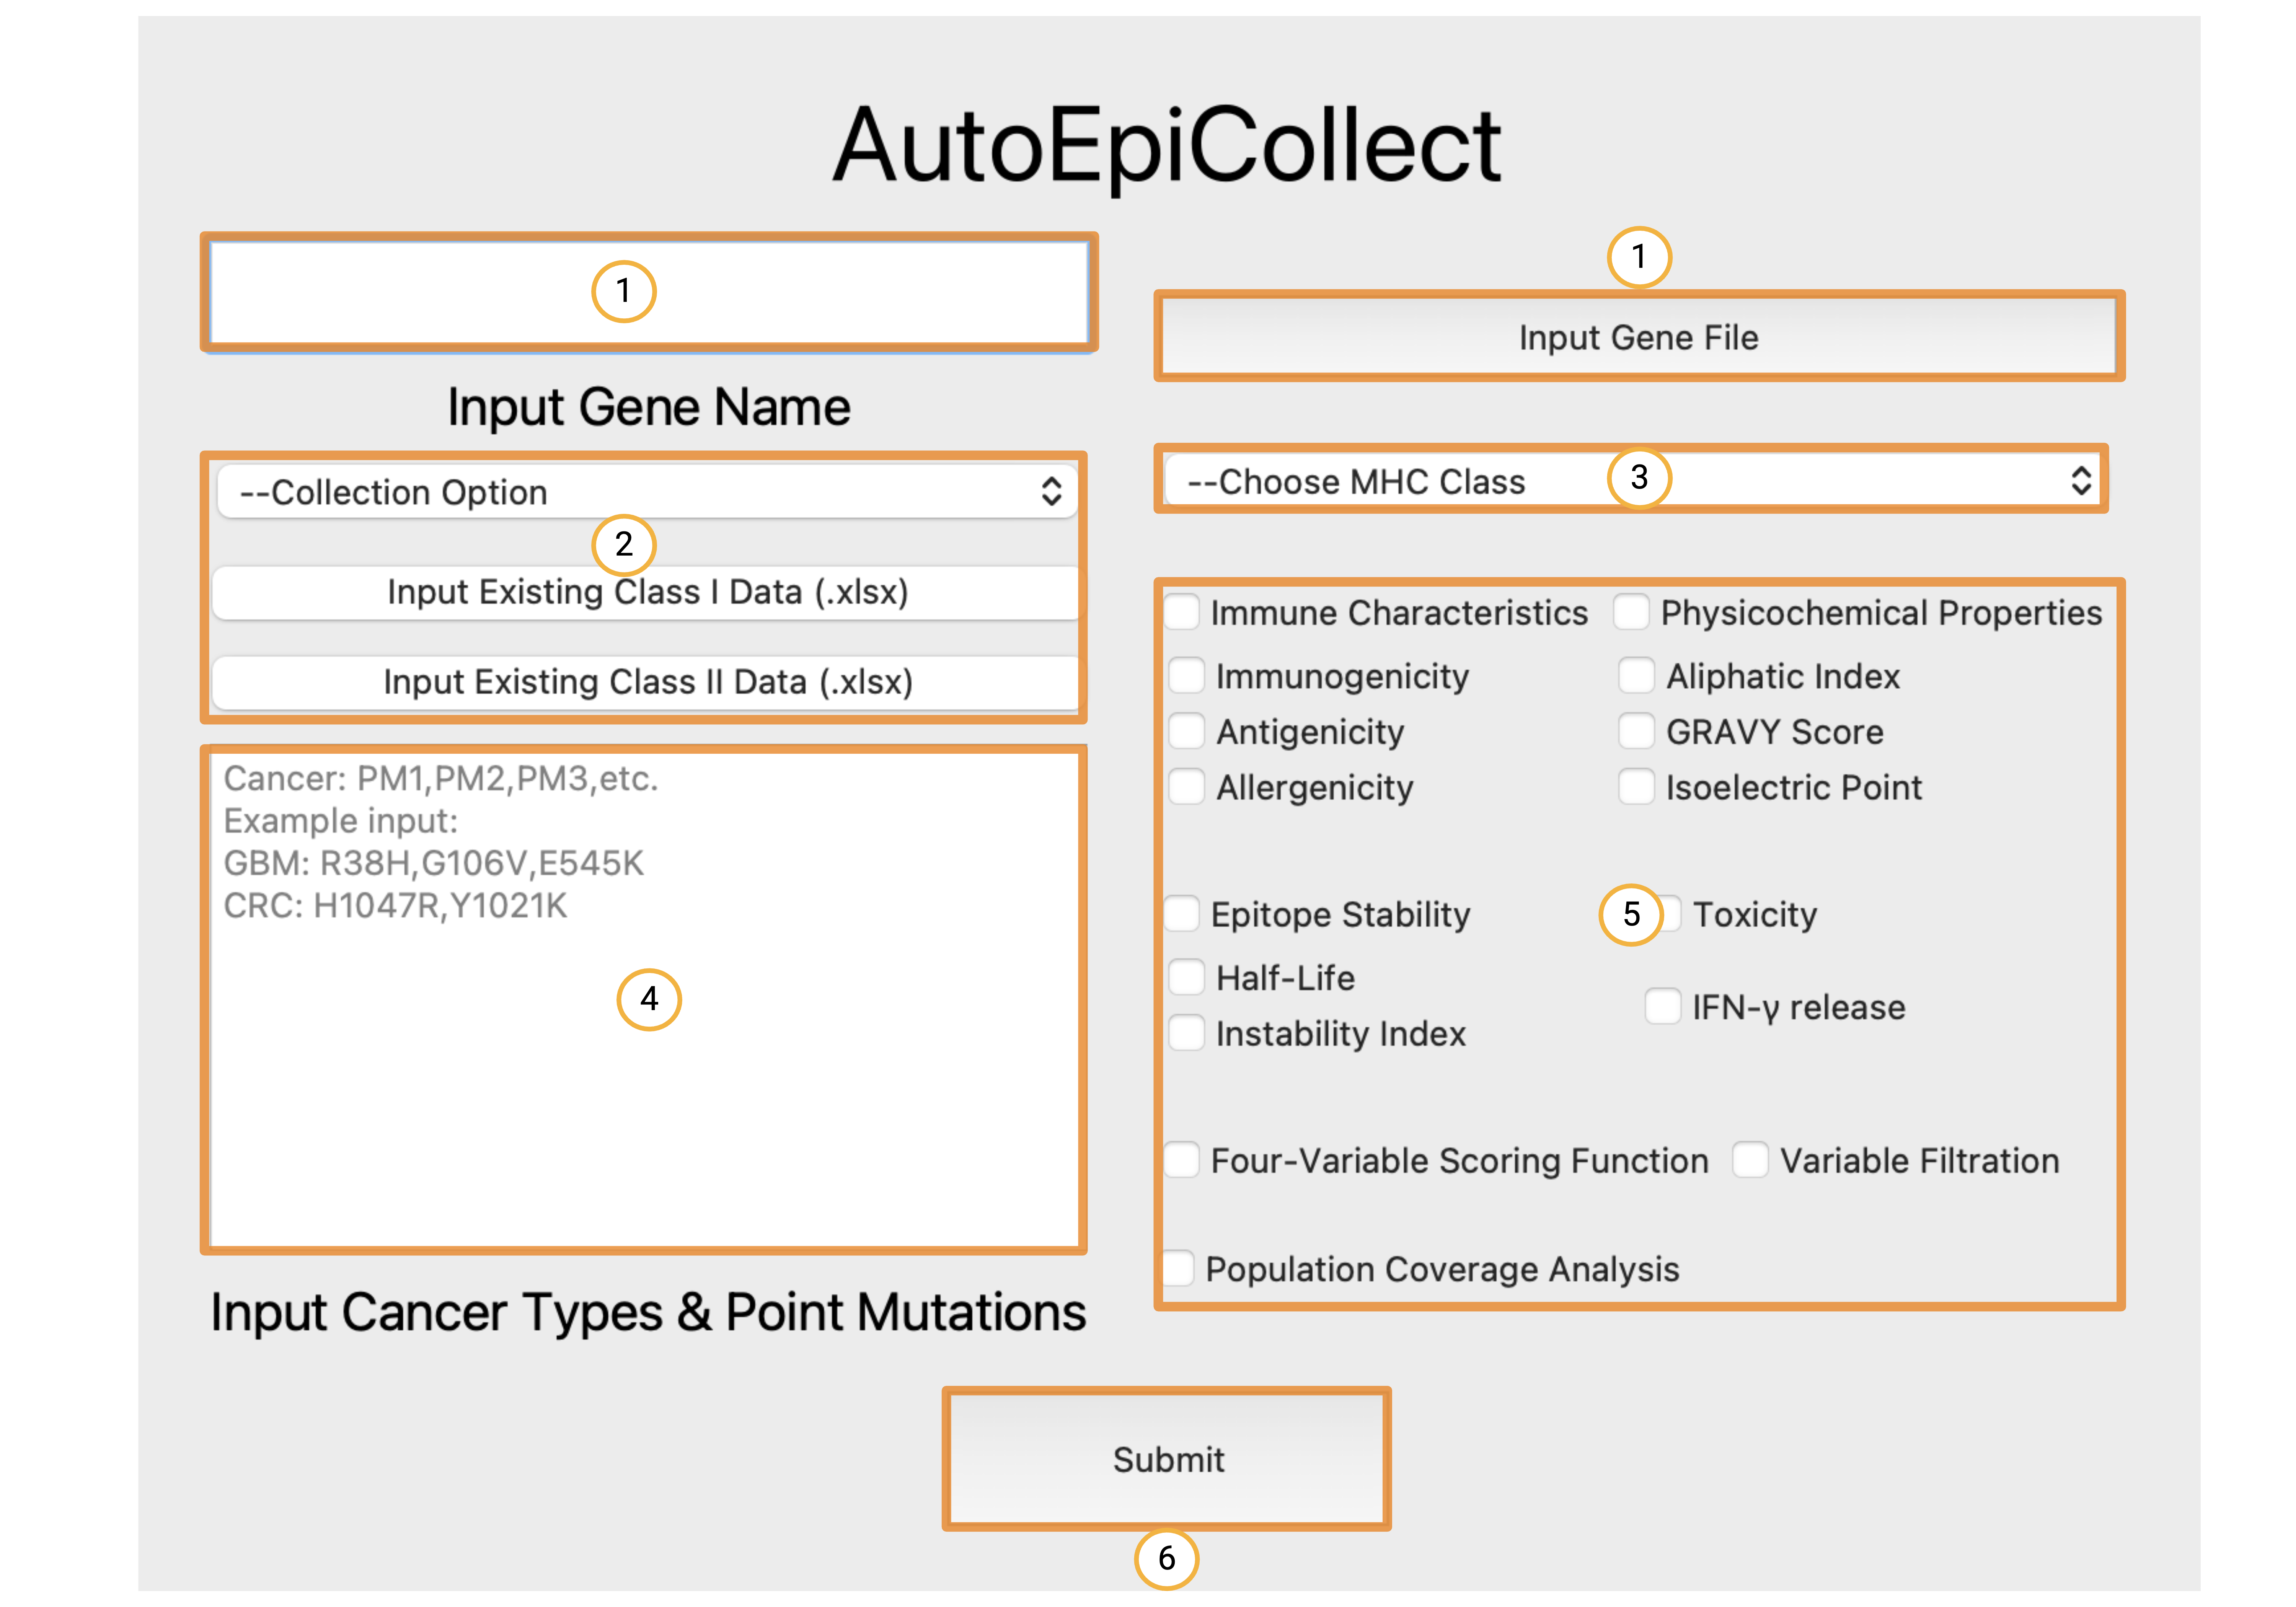
Inputting Required Data and Configuring Run Settings
The numbered boxes in the home screen above show the order of inputs:
- These two fields are for specifying the gene target. The white box on the left is where you can type in the name of your gene target. AutoEpiCollect will retrieve a FASTA-formatted file of this gene's peptide sequence from UniProt. The button on the right is if you want to input your own FASTA-formatted gene sequence. Simply click this button and choose your desired FASTA-formatted file.
- This field specifies how you want your epitope data to be collected. There are two options from the drop-down menu, "Collect New Data" and "Update Existing Data". Choose the "Collect New Data" option if you want to start the epitope selection process from scratch. Choose the "Update Existing Data" option if you have collected epitope data targeting specific mutations, but want to add more mutations to your final cancer vaccine. If you have selected the "Update Existing Data" option, please click the "Input Existing Class I (or Class II) Data" button and choose your previous data file with the original point mutations. Remember that this file must be the unranked and unfiltered epitope Excel file for this option to work. A summary of all the initial and final filenames will be discussed down below.
- The third field is a drop-down menu asking which MHC Class you would like to collect epitope data from. You can choose to collect Class I, Class II, or Class I and II data.
- Field four is for inputting cancer types and point mutations of interest. Input a name or abbreviation of each cancer type you are studying, as well as the relevant missense mutations associated with each cancer. Please format the cancers and mutations exactly how you see in the example, with a new line separating each cancer.
- Field five is where you specify the run configurations for the epitope selection process. Each epitope characteristic is grouped into categories based on its properties. Binding affinity is obtained by default and cannot be switched off. Click on the epitope characteristics that you want AutoEpiCollect to obtain when selecting the top epitopes. The four-variable scoring function requires the immune characteristics in order to work. Because of this, checking the four-variable scoring function box will automatically select the immune characteristics. Filtering is based off of the epitope stability characteristics, toxicity, and IFN-gamma release. If filtering is checked, AutoEpiCollect will filter epitope data according to the filtering characteristics that are checked. For example, if you want to filter epitope data and only toxicity and half-life are checked, then filtering will take place based on these two characteristics. If instability is checked as well, then filtering would be based off of all three characteristics. The last checkbox is for population coverage analysis. This setting allows AutoEpiCollect to calculate the coverage of a vaccine composed of the top epitopes predicted by AutoEpiCollect. This setting is optional, but is important when determining the utility of your finalized vaccine.
- The final button on the home screen labeled six is the submit button. Pressing this button will take you to the output window shown below where you can view the progress of AutoEpiCollect's epitope selection method with live updates.
Note: The MHC Class I allergenicity tool, the toxicity tool, and the IFN-gamma release tool are all created under the same research group. Sometime, these websites are down for bug fixes which may cause the web servers to become unreachable. If you see that AutoEpiCollect is failing at these steps in the epitope collection process, please wait up to 48 hours to allow these web servers to come back online.
Note: On some Windows machines, AutoEpiCollect cannot export epitope results to .xlsx files when an .xlsx file of the same name is open in Excel. To make sure the program runs smoothly, please close out of the Excel application while AutoEpiCollect is running.
Output Window and Viewing Final Epitope Results
 After pressing the submit button, you will be taken to this output window which shows live updates of
AutoEpiCollect's progress. During this time, you will be allowed to hit the back button and view what options you
have selected, but you cannot restart the epitope selection process until the program is complete or until you close
out the program while it is running. Clicking on the "Click for Output" button when the program is completed will
open an Excel file ("all_variables_{mhci or mhcii}.xlsx") of all the pre-ranked and pre-filtered epitope data collected,
organized by point mutation. View the table below to learn about what possible output files are made during AutoEpiCollect's epitope selection process.
You can find all the files if you navigate to the created AutoEpiCollect directory.
After pressing the submit button, you will be taken to this output window which shows live updates of
AutoEpiCollect's progress. During this time, you will be allowed to hit the back button and view what options you
have selected, but you cannot restart the epitope selection process until the program is complete or until you close
out the program while it is running. Clicking on the "Click for Output" button when the program is completed will
open an Excel file ("all_variables_{mhci or mhcii}.xlsx") of all the pre-ranked and pre-filtered epitope data collected,
organized by point mutation. View the table below to learn about what possible output files are made during AutoEpiCollect's epitope selection process.
You can find all the files if you navigate to the created AutoEpiCollect directory.
| File* | Description |
|---|---|
| {gene_target}.fasta | The protein sequence of your gene target. |
| mutant_gene_fastas | Mutated sequences of your gene target based on all the point mutations inputted. |
| Sequences | A folder containing .txt and .fasta files of mutated 9-10mer (MHC I) and mutated 15mer (MHC II) epitopes used as input for in-silico tools. These tools were used to collect selected epitopes characteristics. |
| all_variables_{mhci or mhcii}.xlsx* | All possible mutated epitopes and selected characteristics to be included in the data collection process. This file must be used as the starting file when updating existing data. This file is organized by point mutation. |
| all_epitopes_by_cancer_{mhci or mhcii}.xlsx* | All possible mutated epitopes and selected characteristics to be included in the data collection process. This file is organized by cancer type. |
| all_variables_ranked_{mhci or mhcii}.xlsx* | All possible mutated epitopes ranked by AutoEpiCollect's scoring function. This file is organized by point mutation. |
| ranked_epitopes_by_cancer_{mhci or mhcii}.xlsx* | All possible mutated epitopes ranked by AutoEpiCollect's scoring function. This file is organized by cancer type. |
| top_epitopes_{mhci or mhcii}.xlsx* | Filtered epitopes meeting the exclusion criteria. These epitopes may or may not be ranked based on the desired settings. This file is organized by point mutation. |
| top_epitopes_by_cancer_{mhci or mhcii}.xlsx* | Filtered epitopes meeting the exclusion criteria. These epitopes may or may not be ranked based on the desired settings. This file is organized by cancer type. |
| filtered_epitopes_{cancer}_{mhci or mhcii}.txt | A list of all epitope/HLA pairings in each cancer type inputted into PCOptim/PCOptim-CD. The corresponding cancer type will be shown inside the {cancer} brackets. |
| optimized_epitopes_{mhci or mhcii}.xlsx* | Optimized epitopes chosen by PCOptim-PCOptim-CD to be inputted into the population coverage analysis tool. This file is organized by point mutation. |
| optimized_epitopes_{cancer}_{mhci or mhcii}.txt | Optimized epitopes chosen by PCOptim-PCOptim-CD to be inputted into the population coverage analysis tool. This file is organized by cancer type. |
| population_coverage_results_{mhci or mhcii}.xlsx* | Population coverage results for both the regular (filtered) and optimized list of epitope/HLA pairs. The coverages are calculated for each major world region. |
| Population_Coverage_Plots | A folder containing population coverage graphs for both the regular (filtered) and optimized list of epitope/HLA pairs. There are graphs for each major world region. |
*If the "Update Existing Data" option is selected, these files will show as "{filename}_updated.xlsx"
This is the end of the AutoEpiCollect documentation webpage and user guide. For further questions or persisting issues please contact mvsamudrala@gmail.com